Home » Posts tagged 'mulching'
Tag Archives: mulching
How Landscaping Enhances Your Home’s Curb Appeal
Landscaping Springdale AR is a creative endeavor that balances aesthetics and functionality. It incorporates horticultural elements like plants, flowers and trees, as well as structural features like pathways, patios and water features.
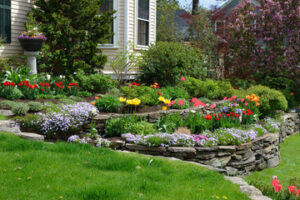
Proper landscaping can help raise property value and provide a relaxing outdoor retreat. In addition, it can improve air quality and support wildlife and pollinators.
The overall look of a landscape is determined by several elements, including line, form, color and texture. The landscape designer’s job is to combine these factors into a cohesive design. This requires a combination of artistic ability and technical knowledge. Landscape designers use a variety of tools to help them create their designs, such as CAD software and other advanced visualization programs.
Landscape designers work on a variety of projects, both residential and commercial. Most of the work involves creating a beautiful, functional outdoor space for homeowners. The landscape designer works with the client to determine their needs and the conditions of the site. Then, the designer uses this information to create a plan for the project.
One of the most important aspects of landscape design is the selection of plants. Different plants have different characteristics that influence how they grow and their appearance in the landscape. Plants also have different effects on the environment and people who use the space.
Another important factor is the balance and proportion of the landscape. Landscape designers use a variety of techniques to achieve this balance and proportion, such as symmetry, repetition and scale.
The landscape designer must also consider the size of plants and other features when designing a space. This is because large elements can dominate a landscape and overwhelm smaller elements. In order to avoid this, the landscape designer must carefully select plants and other features that are in proportion with each other and with the surrounding spaces.
In addition, the landscape designer must consider the colors of the plants and hardscape materials. This can be a difficult task, but it is essential for creating a balanced and harmonious design. The designer can use the color wheel to assist them in making these decisions. The color of a flower or other plant will affect the way it looks in the landscape. For example, a white flower will look different in the sun than it does in the shade.
The last element to consider is the texture of the landscape. This can be achieved by using a variety of hardscape materials and plants with different textures. For example, a gravel walkway will have a different texture than a paved sidewalk. Adding these different textures will add interest to the landscape and draw attention to specific areas of the garden.
Hardscaping
Hardscaping involves nonliving, hard elements like concrete, wood and stone that form the structure of your landscape and creates visual appeal. It provides a contrast to the more organic softscape elements of trees, flowers and grasses that make up the bulk of any landscaping project.
It can involve the construction of pathways, patios, driveways and retaining walls, as well as garden features like fountains, ponds and waterfalls. It also includes outdoor structures like sheds and pergolas that can serve as functional living areas for entertaining or relaxing.
Unlike softscape, hardscaping is generally permanent and less easily changed. It is therefore important to consider the long-term impact of any hardscaping element before it is installed.
A skilled team of hardscaping experts can help you determine the best materials to use, and advise you on the maintenance requirements. They can also assist you in designing a hardscaping plan that complements your overall landscaping vision and fits your lifestyle.
The most common types of hardscaping are paths, patios and walkways. These features can be made from a wide variety of materials, including bricks, gravel, stones, concrete and wood. They provide structure to a landscape, increase usability and accessibility, define and differentiate spaces, prevent erosion and improve longevity and durability.
Another important aspect of hardscaping is achieving a smooth transition from your yard to the natural world around it. This can be accomplished by using curving lines and shapes to guide onlookers’ eyes through a landscape, focusing their attention on key features of the environment such as a pond or water feature.
Livable hardscape features such as a paved patio, built-in barbecue or deck are also popular among our clients and can extend the time spent outdoors by allowing them to enjoy their landscaping features. For example, a paved patio with a fire pit or seating area will allow you to comfortably spend the evenings outdoors, well into the cooler months.
Hardscaping is a crucial part of any landscape and it can greatly enhance your property’s value. A well-designed hardscape will save you hours of labor and will look great for years to come. It will also increase your home’s curb appeal and attract potential buyers in the future when you decide to sell your property.
Irrigation
Irrigation is one of the most important factors that affects the overall look of a landscape. Proper irrigation ensures that your green spaces stay healthy, vibrant and well-tended. It also helps to conserve water, a valuable resource that is in short supply around the world. Irrigation systems are designed to provide regulated amounts of water directly to the roots of your plants, shrubs and trees. Irrigation specialists evaluate soil, climate, plant species and sun exposure to design a system that meets your project goals. Regular inspections, maintenance and upgrading to the latest technology help maintain efficiency.
Watering efficiently prevents weeds and overgrowth while encouraging deep root growth. Irrigation systems that utilize smart sensors and timers automate and adjust the amount of water provided based on real-time weather patterns and soil moisture levels. This enables landscaping to receive water when needed and saves gallons of water during times of rainfall or drought.
Well-maintained green spaces contribute to a positive image for a commercial property. Employees, customers and tenants appreciate businesses that value environmental responsibility. Installing a high-efficiency irrigation system shows you care about the quality and condition of your property’s green spaces and respect the value of water resources.
Proper irrigation systems distribute water evenly, preventing erosion on sloped properties and preserving nutrient-rich soil structure. They also help to protect against water runoff, which can damage the foundation of buildings and create unsafe conditions for pedestrians. Regular system maintenance includes checking sprinkler heads and ensuring that water is not being wasted through leaks, clogs, improper system calibration or erratic rainfall.
Whether it’s a commercial property, residential community, apartment complex or shopping center, a thriving landscape adds curb appeal and increases the value of your property. A mowed lawn, lush plants, colorful flowers and well-tended shrubs can all increase property values and boost your reputation as an employer or landlord. A professionally installed and maintained irrigation system is the best way to ensure your landscape stays in top shape, enhancing the appeal of your building and surrounding areas.
Lighting
The right lighting transforms your landscape into a warm, inviting place after dark. It extends the usability of your outdoor space and enhances your home’s curb appeal. It can highlight dramatic architectural features, decorative elements, and functional areas that might otherwise fade into the shadows.
A carefully designed lighting scheme adds depth, emphasizes contrasts, and creates a sense of space. It can also draw attention to important safety features such as pathways and seating areas, or simply provide a beautiful view at night. The style of lighting you choose should complement the design aesthetic of your landscape and your home, so it will feel like a cohesive whole.
There are three main types of lighting: uplighting, downlighting, and ambient. Uplighting is used to illuminate plants and structures by shining light downward. This technique is great for highlighting the silhouette of a large tree or other focal point, and it looks especially beautiful when illuminated by natural light at sunset. Downlighting is a similar technique that creates an ethereal effect by bathing a surface in soft, diffused light. It is perfect for illuminating a walkway, pool deck, or patio area and is often used in conjunction with uplighting to create an overall glowing effect.
Ambient lighting is achieved by aiming lights at the ground level to illuminate the surrounding foliage. This can be done with path lights, low-voltage flood lights, or well lights. The key is to avoid over-illuminating the surrounding area so as not to detract from the beauty of the surrounding landscape.
Finally, cross-lighting is a technique that eliminates shadows by lighting the same feature from both sides. This works beautifully on trees, boulders, or any other landscape element. It is especially effective on saguaros and agaves, which take on an almost-moonlike appearance when cross-lit.
It is also important to consider dark sky lighting principles when choosing your lighting fixtures and techniques. A professional will ensure that your lighting system is both efficient and properly shielded to minimize light trespass and glare.
Sod Installation – The Importance of Proper Preparation
Sod Installation Greensboro is a great way to have a lush lawn without having to wait for traditional seeding. However, it requires careful planning and execution to ensure successful results.

Start by laying the sod along a straight edge such as a driveway or sidewalk. Stagger seams in a brick-like pattern to avoid gaps and overlap. After installation, roll the sod with a lawn roller to eliminate air pockets and encourage soil contact.
Soil preparation is a crucial factor in achieving a lush, vibrant lawn. Incorrect preparation can lead to sod failure, requiring costly remedial work to correct the problem. It is therefore important for professional landscapers and homeowners alike to understand the role that soil plays in the successful establishment of sod.
Soils differ in their structure, fertility, and ability to retain moisture. The process of laying sod can disrupt the natural balance of soil layers, leading to nutrient deficiencies and a difficult-to-maintain lawn. Soil preparation involves identifying the type of soil and its current condition and then making necessary changes to create an ideal environment for sod growth.
Performing a thorough soil test provides essential insights into the soil’s pH and nutrient levels. It also allows for the identification of any organic matter or other amendments needed to create an optimal growing environment. The best time to perform this test is prior to preparing the site for sod installation, as it gives you the most accurate results.
When preparing soil for sod, the first step is to remove all existing grass, debris, and weeds from the area. Then, till the soil to a depth of 4-6 inches to break up and loosen compacted clumps.
After the soil is prepared, it should be lightly raked and moistened. It is also important to ensure that the soil is at the right temperature to encourage sod root growth. It should be about 65 °F (18 °C).
It is recommended that the area be lightly mowed prior to installing sod, as this helps to prevent the soil from drying out and allows for an even surface for sod placement. If the area is sloped, it should be graded to facilitate drainage and prevent water pooling around foundations or other structures.
Once the site has been prepared, a layer of quality topsoil should be added. This layer should be a minimum of 6 inches thick, and it should contain organic material and adequate nutrients. It is also recommended that the topsoil be amended with the addition of lime (to raise pH) or sulfur (to lower the pH), depending on the soil test results.
Leveling the Ground
When laying sod, the level of the ground plays a significant role in the overall success and longevity of your yard. A well-leveled surface prevents water pooling, soil erosion and uneven grass growth, promoting healthy, vibrant results. Professional landscapers use various tools to achieve a perfectly smooth surface, including a rake and lawn roller, which help to eliminate air pockets for improved root-to-soil contact. This ensures the best possible results and helps sod firmly establish its roots, preventing the need for constant maintenance.
The initial site preparation process includes clearing the area of weeds, debris and old grass to create a clean slate for sod. It also involves assessing the soil’s quality and determining whether any amendments are necessary. A soil test evaluates the pH levels, nutrient content and organic matter composition, allowing landscapers to make appropriate adjustments. Adding topsoil to low areas and tilling the soil help improve its quality.
During the grading process, it is important to leave a few inches of clearance below structures such as patios, walks and driveways to ensure proper drainage. It is also necessary to slant the ground slightly away from structures, as this promotes water runoff and reduces erosion risk. In addition, slopes should be graded to avoid pools of water that could damage the sod or cause weeds to grow in unwanted places.
Once the soil is prepared, it is time to start the actual sod installation process. Landscapers begin by identifying the longest straight edge of a walk, patio or driveway to lay the first sod roll along. They then pull sod slabs to fit tightly together, avoiding gaps or overlapping as these weak points can contribute to unsightly erosion and allow weeds to establish.
Once sod is laid, it must be thoroughly watered to provide the necessary moisture for its immediate establishment. This is usually done three times a day for the first two days, followed by gradually reducing frequency to promote stronger, deeper roots and drought resistance.
As the sod grows, fertilization can be used to promote healthy growth and prevent nutrient deficiencies. Periodic aeration and overseeding are also recommended to keep the soil looking its best and encourage deep root development.
Laying the Sod
So you’ve moved into a new house and want to install sod for a lush green lawn. But before you start laying sod, there are several things you should do to prepare the site. First, remove any rocks, roots, and other debris that may interfere with the sod’s rooting process. This will also help eliminate lumps and bumps that make mowing difficult later. Next, rake or till the area to level it out and break up any soil compaction. This will improve soil aeration and promote healthy root growth. You should also consider conducting a soil test to determine the soil’s pH and nutrient content. This information can guide your choices regarding whether to add soil amendments such as lime or acidifying products.
Once the soil is prepared, water it thoroughly. It’s a good idea to apply a starter fertilizer high in phosphorous just prior to sod installation. This will encourage the sod to establish roots and provide immediate nutrition.
When you’re ready to begin laying the sod, identify the longest straight edge in the yard and begin with this area. Work your way outward, staggering the sod rows as you go. This helps prevent noticeable seams, and it makes it easier to fill in small spots later with trimmed sod pieces.
A staggered brick pattern is best for sloped areas, as well. This keeps the sod from drying out too quickly on its downhill side. It’s also important to butt the edges of the sod tightly together without overlapping. This will prevent the edges from drying out and wilting, which can lead to unsightly gaps and a sloppy appearance.
Once all the sod is installed, you should roll the lawn a few times to ensure good contact between the soil and the sod’s roots. After this, it’s important to keep the sod properly watered. Ideally, the sod should be kept moist but not saturated at all times, with two half-inch waterings a week. This will encourage rooting and discourage fungal problems. Depending on the climate, sod should be watered less frequently during winter, when it goes dormant but still needs moisture to stay alive and healthy.
Watering the Sod
When it comes to new sod, watering is one of the most critical aspects of a successful installation. Proper watering helps the sod establish a strong connection with the soil, ensuring long-term success of your lawn.
Too little and your sod will dry out, leaving you with patchy grass; too much and it could rot or drown. Learning how much and when to water your sod will help you avoid these problems.
On the day of sod installation, thoroughly water it to a depth of 6 to 12 inches. This initial soaking alleviates transplant shock and provides the sod with the water it needs to start growing roots. Watering is best done in the morning or afternoon when temperatures are cooler.
The sod should remain consistently moist during the first two weeks after installation. During this time, the ground should never be soggy or completely dry, as this can lead to disease and slow root growth. Instead, it should remain slightly moist at all times to provide the sod with a constant supply of nutrients.
During the first week of watering, monitor the amount of water that is being used and make adjustments as needed. The more sun and wind a lawn receives, the more water it will need; sod on hills and slopes may require more water than those in lower areas. In addition, water will evaporate more quickly on hot and windy days.
Once the sod has established roots, it is safe to reduce watering frequency. It is important to monitor the sod as you do this, however; if it appears that the roots are not taking hold, return to daily watering for the next week or so. After this time, water the sod every other day for approximately half as long as you did during the first week.
When watering, be sure to use a sprinkler system or hose that can provide consistent coverage over large areas of your lawn. Aim for an even surface, paying particular attention to corners and edges which tend to dry out faster due to heat reflected from buildings or houses. Finally, check for air pockets; these can cause sod to die if they are not flattened out.